Web service authentication
Web service authentication is a quite versatile approach providing challenged authentication using the user own Active directory via an LDAP query as the authentication provider. It can be used to provide authenticated login on both hosted and deployed sites. The logged in user is not anonymous and several of the users OU fields from their Active directory entry can be mapped to equivalent field in their Sitekit user. Overall this approach is sometimes referred to as ‘same sign on’.
This page will focus on the use of remote LDAP (Lightweight Directory Access Protocol) query to AD over the Secure Socket Layer (SSL) on order to authenticate users but it's important to remember that administrators could create their own web service that does a simple lookup of a deployed staff directory for the same result. Authentication via web service in its simplest form is hooking up a group to a web service that checks a 3rd party list somewhere, if the relevant passed through credentials are on that list then the user gets in.
Implementation via LDAP query of Active Directory
The Sitekit LDAP Authentication web service is freely available to Sitekit users and can be downloaded and installed on customers’ servers from bitbucket as a visual studio project at https://bitbucket.org/Sitekit/ldapauth/wiki/Home. It’s expected that local systems administrators would configure and alter the code to suit their specific needs. The LDAP Authentication web service queries a customer’s Active Directory in order to authenticate a user. Once authenticated a mapping function within the LDAP web service maps the fields in the active directory to those in the CMS resulting in the Sitekit user being updated with the active directory data. The result is that the user is authenticated and that when access is given their details are also mirrored in the Sitekit database allowing for personalisation within the site. From the end user perspective they only have to remember one set of login credentials - their normal network credentials.
When an AD member belongs to several groups this is dealt with by using a common naming convention. The relevant access groups in Sitekit need to be created with the same names as those used in the Active directory then when the user is authenticated they will be associated with the same named groups in Sitekit. It’s up to the site administrator to ensure that the Sitekit groups have the necessary levels of access that mimic their AD counterparts.
Installation of the LDAP web service
The Sitekit LDAP project requires the Microsoft .Net Framework to be installed. The project contains both VB and C# codebases for authentication and their associated field mapping function. It also contain web services that can be used for providing AD staff list in order to create an AD based staff directory on the relevant site however these latter files could be deleted from the project if not needed.
The LDAP project should be downloaded from bitbucket and set up on VS2010+ It should then be configured as documented here and deployed onto a server within the client network. Configuration should occur in two main areas:
- The addition of entries for the relevant two LDAPServer keys in web.config. LDAPServers and DomainPrefix
- The editing of the mapping array SKNameToADNameMappingsto map the relevantsitekit user field name to that used in the respective AD entry
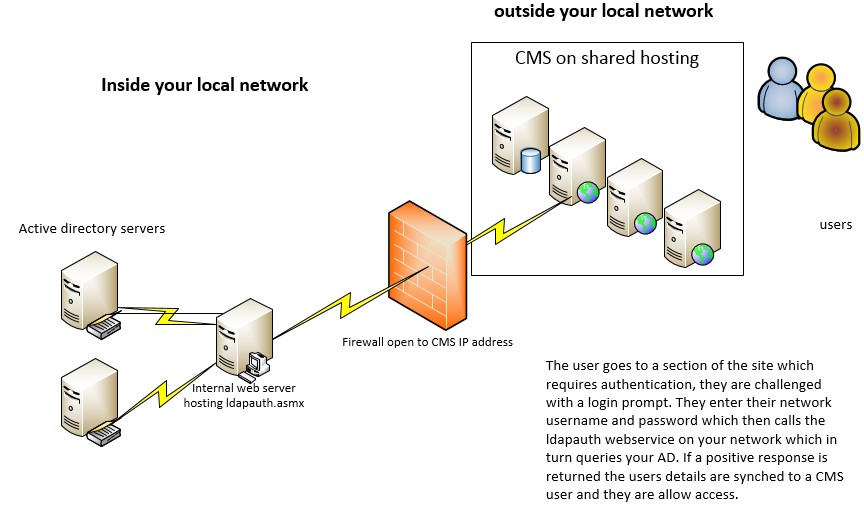
The basic server architecture is shown below. The server hosting the ldapauth service needs to be accessible from the CMS installation, if the CMS installation is out side the network then limited access need to be provided through the firewall. This can be locked down via IP
Once installed test by invoking the "IsAuthenticated" web method locally and enter a Windows username, password and click the "Invoke" button to test the web service. An XML document should be displayed, as follows if the correct credentials were entered
<authenticated>True</authenticated>
Associating the web service with the CMS
- Login into Sitekit CMS admin
- Navigate to CMS->User Groups
- Click "Add a New User Group" or select an existing user group and click "Edit Admin Rights"
- Edit the "Group Name" and admin rights as appropriate
- In the "Web Service Authentication URL" field, enter the address of the LDAPAuthentication web service, (e.g. http://your.Server.com/LDAPAuthentication/LDAPAuth.asmx/IsAuthenticated?group=development)
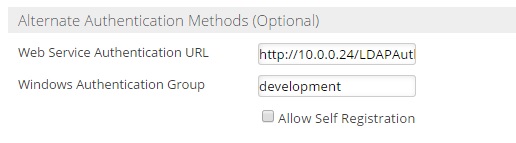
- The 'windows authentication group' field is used for windows authentication
- Save the group details
- Check that it works by logging out and logging into Sitekit CMS admin using a Windows username & password
Points to note
- Ensure IIS logging is TURNED OFF for this application when deployed on the relevant webserver.
- Sitekit CMS doesn't currently support multiple groups for users, so a user can only be logged in under a single Sitekit CMS user group. Therefore, if there are several Sitekit CMS user groups set up, each configured for LDAP authentication with a different Windows user group, the user will be logged in under the first Sitekit CMS user group whose LDAP authentication service returns true. (This only affects users who belong to more than one Windows user group.) The authentication order of the groups can be set within the User Group tab in the Control Panel.
- Extranet login pages feature a “forgot your username/password” link. This feature only applies to users that are registered on the Sitekit CMS admin system and will not work when using LDAP authentication.
- In some circumstances you may need to turn impersonation on in the web.config as shown below. Typically this is required if you are having issues getting a true response for valid credentials, especially in a multi-domain network
<system.web> <identity impersonate="true" /> </system.web>