Understanding permissions and access
To manage access and control in Sitekit, you need a thorough grasp of three concepts;
- Permissions: Actions – such as editing and publishing pages, or updating user accounts – are controlled by permissions. If your user group doesn’t have permission to perform a particular action, then the action is forbidden to you.
- User Groups: Users belong to User Groups. Every website will typically have several User Groups. Each User Group has a different set of Permissions, thus allowing members of that Group to carry out different actions. Typically there would be Editor Groups, Administrator Groups, and so on. The permissions set in the User Group mostly govern the user's access to different sections of the administration system (accessible via the ribbon menus across the top of the screen).
- Asset Classes: Every item in the asset tree has an Asset Class applied to it. Each User Group can be assigned a different set of Permissions to each Asset Class.
So you have two sets of permissions – one at User Group Level, and one at Asset Class level. Why two sets? Because this gives you granular control over who can do what to which part of the website.
Since every asset on the website has to have a set of Asset Class permissions, you’d think it would be a lot of work to assign them all. Sitekit, however, is designed to automate the process.
Firstly, Sitekit comes with a set of standard Asset Classes to get you started – Build Assets (for templates), Default (for pages), Downloads, and Images (though they may have been changed or deleted as part of a site's development).
Secondly, when you create a new Asset in the Asset Tree – a page, or an image, say – it will automatically inherit the same Asset Class as the Folder it’s in. So, by default, all the work is done for you. You only need to change Asset Class Permissions when you want an item to have different values from the other items in its folder.
Example
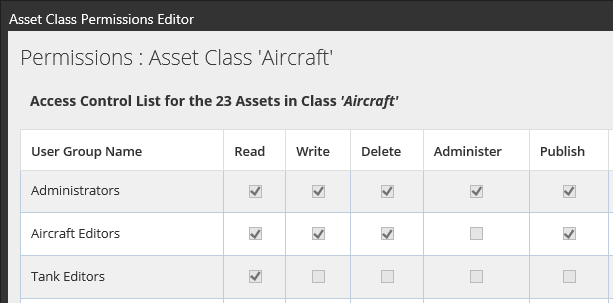
Imagine an online military magazine which publishes articles on Tanks and Aircraft. The magazine has a dozen editors – half of them tank specialists, and the other half aircraft specialists. Obviously every editor has to have basic read-right-delete-publish rights, or they can’t do their job.
So how can you prevent Aircraft Editors messing about with articles on tanks?
By creating a Tanks Asset Class.
Tank Editors can be assigned powerful permissions to this Asset Class, while Aircraft Editors are only granted permission to read about them. Similarly you can create an Aircraft Asset Class, in which the Aircraft Editors have all the permissions.
Managing an asset’s asset class
Right-click a folder in the Asset Tree, select Permissions >> Asset Class Usage, and you are presented with a list of all the assets in that folder. You can tell at a glance which asset class each item belongs to. Items that share the same asset class as the folder are shown in green. Assets with another asset class applied to them are shown in red.
In a rigidly controlled site you might expect every item in an asset tree folder to share the same asset class. But sometimes – by accident or for a good reason – this may not be the case. So it’s a good idea to check the usage tool occasionally.
At the top of the report is a function that allows you to change the asset class applied to assets in bulk. Changing the asset class selected in the drop-down will cause checkboxes to appear next to the listed assets. Simply select the assets you wish to update, then click Apply this Class to Checked Assets.
Setting asset classes at folder level
Right-click a folder in the asset tree, select Folder Properties, and a pop-up will appear which includes an Asset Class drop-down. This allows you to change the asset class that applies to the folder, and also to apply it recursively to all of the assets and sub-folders within it. For this reason it is recommended that you structure your asset tree with permissions in mind. For instance, if you anticipate setting separate permissions for a specific branch, it is best to create a dedicated folder for that branch in the asset tree, then placing the branch's pages within the folder. If it is a new branch (one page) then placing it within the folder will cause any new child pages created in the navigation tree to not only inherit the parent's asset class, but also be placed in the same folder as the parent. This makes it convenient to change the asset class applied to the branch (by changing it in the folder properties and applying recursively) in future.
Asset Classes and the Navigation Tree
If you create a child page of an editorial page in the navigation tree, the new page will inherit the asset class of its parent, which may be different from the usual asset class for an editorial page. This is a useful design feature of Sitekit CMS – it enables you to both position a page and assign its asset class simultaneously. But you need to be aware of it if you routinely drag and drop pages in the navigation tree. When you drag and drop, the dropped item retains its original asset class, rather than adopting the asset class of its new parent in the navigation tree.